![]()


|
|
||||
|
|
||||
|
|
|
|||
|
Taking Photographs of
Minerals and Gemstones |
||
|
When using the Nikon 950 in macro mode, the closest focus distance is a little under 1 inch. At this distance the built-in flash unit actually illuminates mostly beyond the object in focus. The flash tends to illuminate only one side of the sample. I use the flash when I am in the field, or shooting samples at someone else's residence where I do not have my halogen lights with me. |
||
|
|
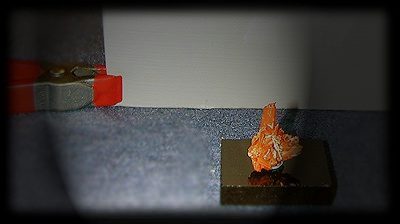
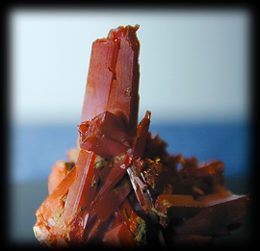
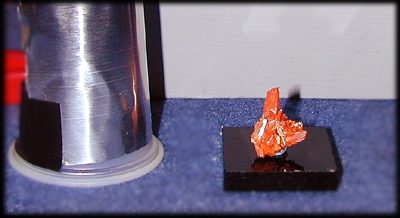
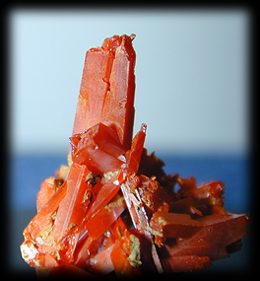
The illustration to the left shows the problem diagrammatically. The sample is located about 1" from the lens which is set in macro mode. When the flash fires, the light concentration does not spread out fast enough to light the sample, but the auto exposure is triggered by the flash causes a dark foreground with well lighted back ground. The two pictures just below show the results. The image below left shows the path of the flash as seen from behind the camera. There is some illumination of the sample, but most of the light is too far to the left. The resultant image is shown below right. It is not a bad image, but lacks contrast and the right site lacks detail. |
|
|
|
|
|
|
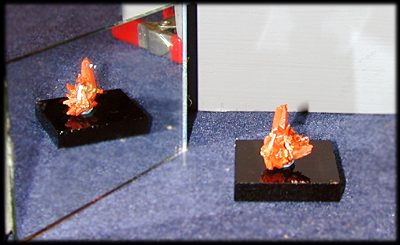
The next photos (below) show a set up I often take with me in the field. I carry a small 2"x3" mirror and hold it to the left of the flash unit while tilting it to about a 45 degree angle toward the subject. This creates a strong contrast ratio of light from left to right. Although this method works fairly well in the field (especially when I shoot mushrooms or other non-shinny objects), it does not work well with mineral specimens. The image below left shows the mirror and the approximate placement to create the photograph on the right. Contrast and color are good and substantially more light is poured on to the sample. The major problem is that bright, shinny surfaces are flooded with strong light, and they end up washing out and showing no detail. By changing the placement (position or angle) of the mirror it is possible to move the over exposure around on most samples, but it is rarely possible to get a well exposed image without blown-out highlights. This method does work well on minerals that are farther away from the camera lens. The mirror can be set at an angle sufficient to throw a more diffuse light, if the mineral sample is back about 3 inches or farther. It just doesn't work well on mineral samples that are within the 0.8" to about 1.5" region of very close focus, where the flash tends to illuminate beyond the sample. So it was time to go back to the drawing board and find something that would produce better lighting from the flash. The answer was a cylindrical reflector where the reflected light is dispersed across the sample, and not concentrated at any one point. |
||
|
|
|
|
|
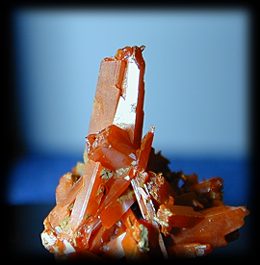
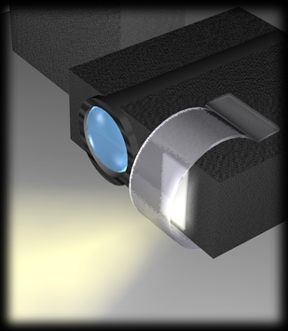
The strange little "gizmo" that I came up with is shown in use below left, and a close up of it is shown farther below on the right. It sometimes takes several exposures to get an acceptable one, and they are taken by moving the "gizmo" some where either in front, to the side, or even slightly behind the sample. The resultant image is shown to the lower right. It has the higher contrast desired, but it does not burn out all of the highly reflective surfaces, and details are saved on most surfaces. It has a similar but less pronounced contrast ratio from left to right. |
||
|
|
|
|
|
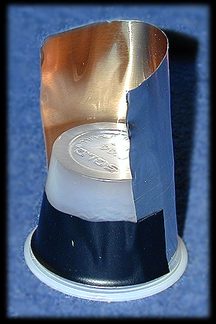
The "gizmo" is made from a piece of the thick hobby foil wrapped around an inverted plastic cup. The kind used to hold about 1 or 2 ounces of condiment. I use a piece of tape to hold the foil in place. This image shows it from the rear side. I use it with the outside foil facing the sample. You can also try using the copper side of the hobby foil out, if you want a warm light. This works well on some samples, but may overwhelm others. It adds a real punch to pyrites and brassy minerals, but turns grey or silver colored minerals into brassy looking crystals. Another technique not demonstrated but sometimes useful is to use a piece of drafting mylar taped over the flash. I usually cut a strip of mylar just about the width of flash unit and tape it over the flash allowing it to produce a semicircle about 1/2 inch from the flash. (See diagram below right.) |
|
|
|
The reason I am not overly fond of this method, is that the flash sensor on the camera may also be covered by part of the mylar and it usually causes poor exposure. But it has worked on occasion. To do the job well, it would be nice to put a large diffuser over the flash, but on my Nikon a large diffuser also covers the lens and or the flash sensor. I end up with too many throw away images. If the you have a different model camera with a better separated sensor and flash. then this method is worth investigation. You might try other objects like a small plastic cap from a medicine bottle. You are looking for something that will diffuse the light and not cover any sensors. |
|
|
|
|
|
|||