![]()


|
|
||||
|
|
||||
|
|
|
|||
|
Digital Photography vs
Traditional Photography |
||||||||||||||||||||||||||||||||||||||||||||||||||||||||||||||||||
|
We have now discussed the three elements of creating a perfectly exposed image in traditional photography. The Film Speed (ISO value), the Exposure (shutter), and the light intensity (f-stop). These three elements work together in a specific fashion. |
||||||||||||||||||||||||||||||||||||||||||||||||||||||||||||||||||
film speed = shutter speed : f-stop |
First a photographer selects the speed and light properties of the desired film. Once an ISO value and the type of light sensitivity is selected, the film is loaded into the camera and the speed of the film is entered into the camera exposure meter. Most of today's cameras have built-in light meters to calculate proper exposure. The built-in light meter must have the film speed as part of its internal calculation. Once a film speed is set in the camera, the light meter calculates the proper exposure for the film. The exposure value becomes a constant, exposure can be controlled by the camera shutter speed and f-stop. Assuming a certain film speed is set, then there are numerous pairs of shutter speeds and f-stops which will create a properly exposed image. Look at the table (Table 1.) to see a possible list of equivalent combinations. Table 2. and Table 3 show the appropriate combinations assuming the ISO value of the film was doubled (made faster). To compensate for the faster film, the aperture was reduced one level for each shutter speed in Table 2.. The same result could have been obtained by increasing the shutter speed one notch for each of the original aperture settings (Table 3.). Film speed, shutter speed, and f-stop all operate on factors of two. Film speed is entered into the meter, and is a constant value. For any measured light condition the meter can calculate the correct exposure based on a specific combination of shutter speed and f-stop. Since everything is based on factors of two, there are many possible correct answers. |
|||||||||||||||||||||||||||||||||||||||||||||||||||||||||||||||||
|
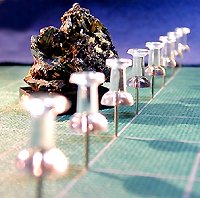
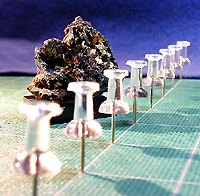
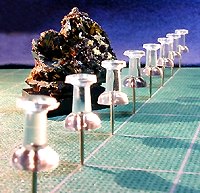
Creativity in photography comes from using the proper combinations of correct exposure settings for the situation being photographed. Besides proper exposure, the pair of settings used can make or break a photograph. Using the correct shutter speed can freeze high speed motion or let is be expressed in controlled blur. The f-stop used controls not only exposure but also depth of field. DEPTH OF FIELD Depth of field could be called depth of focus. as it describes the area in front and behind the main subject matter which is in sharp focus. By selecting higher f-stops, smaller aperture, more of he image will be in sharp focus. If the camera aperture is opened up (lower f-stop numbers) then only the object in explicit focus will be sharp and the other objects will be blurred. Depth of field is used to direct attention to the areas in the photograph that you, as the photographer, wish to emphasise. Later we'll look at some digital tricks to enhance this. See the following three images that help to define depth of field. In the first image, the foreground pin is completely out of focus as are the last 3 pins. In the second picture, the foreground pin has some definition but is still soft, and the rear three pins are coming into focus. In the final image, the foreground pin is still better defined but not quite in focus, and the rear three pins are in focus. The area of critical focus was set at the forth pin from the front. |
||||||||||||||||||||||||||||||||||||||||||||||||||||||||||||||||||
|
||||||||||||||||||||||||||||||||||||||||||||||||||||||||||||||||||
|
Depth of field is also affected by the focal length of the lens. Wider angle lenses tend to have greater depth of field than telephoto lenses. Wide angle lens tend to be in focus from close range to infinity, whereas telephoto lenses have a "compressive" effect on images and tend to have less depth of field naturally. Another note: as magnification increases. the depth of field decreases. The closer you get to an object, the less depth of field there will be. high magnification images, through macro lenses, diopter lenses, or microscopes will show diminished depth of field. The equation for calculating the depth of focus is shown below. |
||||||||||||||||||||||||||||||||||||||||||||||||||||||||||||||||||
f = aperture m = magnification e = circle of confusion |
The one part of the equation that needs some explanation is the "e" term (circle of confusion). Even top quality lenses transmit a point of light as a small circle of light. The best lenses cannot achieve a perfect transmission. The values tend to run between about 0.033 mm and 0.1 mm. We'll use the smallest value (0.033 mm) as it is the least forgiving. The following table will show some representative depth of field values calculated using the formula. |
|||||||||||||||||||||||||||||||||||||||||||||||||||||||||||||||||
|
As you can see the depth of field falls off drastically when we begin to magnify an image. The values at magnifications above 1:1 are typical of a low power microscope. 1:1 can be achieved by some built-in macro lenses that can focus down to less than 1 inch. The table shows that by quadrupling the f-stop, the depth of field can be doubled. Unfortunately, higher magnification usually means more lenses and hence more glass. This results in more light loss, and it is rarely convenient to use high f-stops at these magnifications. |
|||||||||||||||||||||||||||||||||||||||||||||||||||||||||||||||||
|
|
|
|||