![]()


|
|
||||
|
|
||||
|
|
|
|||
|
Taking Photographs of
Minerals and Gemstones |
||||||||||||||||||||||||||
|
At some point a few years ago I decided to look for a camera with more resolution. I wanted to adapt it to my microscope and I wanted to use it both in the field and for desktop photography. There were many digital cameras coming on the market that used removable memory to capture and store the images. So how did I determine which digital camera was right for me? 1.) Make a list of the
things you want to do with camera and the resultant
images. My
list
of Features for a Digital Camera Wants Required
(because of wants) 1.) extreme
close-up photography Must focus to
less than or about 1 inch. (Macro
capability) 2.) adapt camera
to microscope a.) camera
profile cannot change during focus, i.e. the lens
cannot move out and back. 3.) removable
memory would like to
be able to remove memory card and replace without
removing camera from microscope
mount. 4.) images
primarily for WEB, but some for
print sufficient
resolution to produce 8"x10" print @ 150 dpi ...
therefore 1200x1500 min resolution for print. More
than enough for WEB. 5.) manual
controls or over rides cannot be
totally automated in all situations! 6.) price less
than $1000 price less
than $1000 My most demanding criteria turned out to be the combination of no profile change with focus and the extreme close-up. As it happens the vast majority of digital cameras on the market cannot do tight macro photography without supplementary lenses. At the time I purchased my camera this severely limited the field of choice. (There are a few more today which provide for good macro focus.) It appeared that I was going to get a Nikon form my requirement lists. They had close focus to 0.8" and their 900 series of camera did not change profile when zooming or focusing. I ended up buying the Nikon 950 Coolpix Digital camera. A 2.1 Mega pixel (1200x1600), close focus to 0.8", it takes flash memory cards, has an LCD for viewing, has pretty good manual controls as well as automated controls, and could be purchased at the time for about $700. |
||||||||||||||||||||||||||
|
|
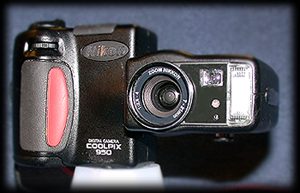
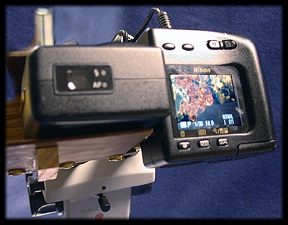
To the left is a photograph of the camera. The lens is located in a swivelling portion of the body and can be swivelled up to about 270 degrees. This is very useful for focusing on objects that are on or near the ground. The camera body can be positioned so the lens is parallel with the ground while the LCD screen (on the other half of the body) can be pointed upward for easy viewing. One bad point of design is that the memory card slot shares the same surface with the tripod mounting screw. Hence the camera must be removed from any tripod before the memory card can be extracted. This was corrected in later models. |
|||||||||||||||||||||||||
|
|
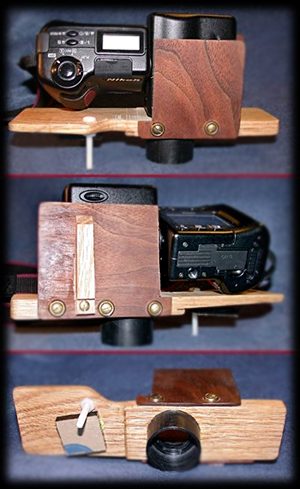
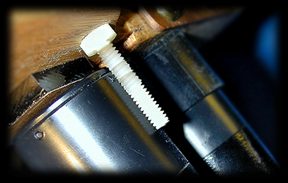
A microscope adapter was created from a little oak and scraps of wood. I used the same type of coupler described on the previous page to fit the adapter over the microscope lens. I cut a hole in the oak to accommodate the plastic tube and opened up one side to fit the microscope lens assembly and the other side to fit the Nikon lens. The white nylon screw extending down through the wooden base sits on the second lens tube of the microscope and keeps the adapter assembly from spinning due to the cameras weight. I used two thin flaps of wood to hold the camera in place, and then opened the opposite side so I could turn the camera body to more easily view the LCD. As an added bonus this also lets me remove the memory card without taking the camera off of the wooden mount. When in use, I use an AC adapter instead of battery power. Once the camera and adapter are on the scope (see picture below), I use the LCD screen on the camera to judge the correct focus. The settings on the camera are as follows: Flash: off - Macro: on (zoomed for maximum image coverage) - my camera does not offer manual focus or I would have it manual focus: ON at this time. I sometimes pre-set the aperture (of which there are four selections on this camera) to get the best depth of field. Unfortunately the depth of field control is not that good as the best f-stop is about f/8. At other times I set it to the most open position (maximum light) so I will have the highest shutter speed. It depends on the subject matter. The images are always captured at 1200 x 1600 and normally are set to the minimal compression setting or one level below. I try to get the highest quality images possible before I begin to modify them with Photoshop. |
|||||||||||||||||||||||||
|
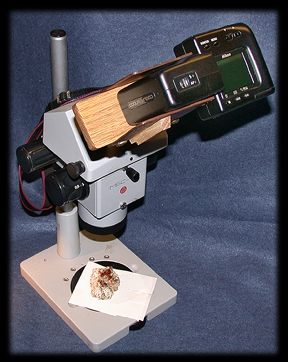
The images below show the camera and adapter mounted on the microscope. The actual image can be seen in the LCD screen and this is what I use to focus the camera. The focus knob on the microscope is used to establish the final focus as it appears in the LCD. The nylon screw rests against the second ocular keeping the assembly from rotating. |
||||||||||||||||||||||||||
|
|
|
|||||||||||||||||||||||||
|
|
|
|||