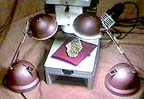
Photo 5.

Photo 6.
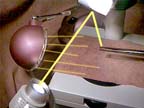
Photo 7.
Because the original spot light (supplied with the microscope) needed strong color correction, additional lights were purchased that had better color value. Two inexpensive halogen desktop lights were purchased (Photo 5). These lights can be acquired for about $10-$20 each in most department stores.
They are so much stronger than the original light, that they can be used in conjunction with the spot light, with the effect of substantially color correcting the combination. Photo 5. shows the general method of illumination for mineral samples, and photos 6 and 7 show the setups for the gemstone photography. A small patch of colored cloth was used below the samples to provide uniform back-ground colors and texture .
Using a white background causes the camera to cut-in its electronic aperture, and this has a negative effect on overall color intensity. In many cases the gemstones were held with tweezers to separate them from the lower surface texture. The texture can show up inside gemstones.
One key in gemstone photography is to get at least one light source pointed directly down at the table of the stone, at the same time not sending strong reflections directly into the camera lens. One method is to direct the light at an angle to the stone's table, this is shown in Photo 6., but this method may fail to internally illuminate a strongly colored stone.
The approximate light paths are illustrated in Photo 6 and Photo 7 with yellow lines. The halogen desklamp is used to provide both side-illumination to the stone, and illumination of the background cloth.
How to |
Prev. Page | 