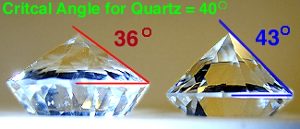
Obligatory Faceting Diagram

Anyone that ever writes about or publishes information on faceting is required to have this diagram. Go ahead find a book that doesn't have something very similar. Ok, so what does it mean? The diagram displays three stone profiles, and explains what happens when you cut a stone to far from the recommended facet angles. It is based on the Index of Refraction, and the far simpler law of reflection. Law of reflection, when a light strikes a flat surface the angle of incidence (the one ray going toward it) will be reflected at the same angle.

Now, realising that when light strikes a surface some will be reflected and some will be refracted. (Discussed previously.) The diagram above shows a stone cut below the CRITICAL ANGLE for a material. (A) - the light light entering the stone is refracted, but because the critical angle is not properly cut at the bottom of the stone, the light paths refracted back out of the stone.

In (b) we cut above the critical angle and near the recommended angle for the material, and thus the light entering the stone is first refracted, but then it is reflected by the bottom of the stone, and then reflected a second time, before exiting through the top of the stone. All in all a very desirable thing. This produces a lively stone.

In the third case (C), we have cut well above the critical angle, so we are safe as far as refraction is concerned, but upon hitting the bottom of the stone, the angle of reflection forces the light to hit the second side of the point and be refracted out again.

So what does this look like in the real world? Here are two pieces of quartz with a critical angle of 40°, and the one on the left was cut with a 36° angle, and the one on the right was cut with a 43° angle. The two cuts have the same number and placement of facets, although the left one does have a larger table. (Flat top.)

Look at the results. The left gemstone has a functional hole (called a "fish eye") right through the center. The right stone does not.

Light passes through the center of the left stone to such a degree that you can actually see text behind it and even read it. Unfortunately this is not all that uncommon in commercially cut stones.

The gemstone photo at the upper left was created using my gemstone holder for photography (see other article on photography), and I placed a small sample of text just below the stone. See the insert above.

When a stone is centered in this holder you should not be able to see any text through the base. Unfortunately many commercial stones do display text through the base.

There are at lest two reasons for this, first commercial (native) cutters often work on very rudimentary machines, nothing like the ones we use in the hobby industry. They use something called "jam-peg" faceting machines and do the work by eye not by machine setting.

Secondly, they are taught to cut the rough in a way to produce stones with maximum weight and not maximum light return. The combination of "jam-peg" machine and "largest possible stone" results in many stones with oval shapes, not just in circumference but also across in cross section. They cut many facets well above the critical angle as they cut down from the girdle, but are forced to finish the stone with facets that are almost flat across the very bottom. Hence the stones produce the "fisheye" effect.

See the finished blue topaz at the left, and look at the bottom geometry above. A rounded bottom that produces no reflections in its center. Hence we can see the text in the middle of the stone. This stone has little life except around the edges.

Another stone, citrine, has been cut the same way. There is reasonable light return around the edges as they are cut with reasonable angles, but at the center, the stone is again lifeless. Notice the similarity in cut of the blue topaz above, and this citrine. I sometimes call this the typical "pineapple cut" as it reminds me of a pineapple skin.

Unfortunately it is not only the less organised "pineapple cuts" that produce problems. Sometime the faceters have access to better equipment, and can produce more interesting and better designs. Unfortunately they still may try to make a heavier stone and cut the bottom facets too shallow.

Look at the citrine to the left, a round stone. It has better cutting quality than the ones above, but the stone was "padded" in weight by cutting angles too steep at the girdle, and failing to leave enough rough to cut correct mains. The result, another "fisheye" more suitable to reading glasses than jewelry. To be charitable, maybe the idea was leave a see through 8-pointed star at the bottom, but if so then why not frost it to make it really stand out.

Take heart, there are some good commercial faceters out there. The blue topaz to the right was purchased as a commercial stone and shows proper angles and a nice design. The text is located below it too, but it cannot be read. A lively, pretty stone.

Now for the good news. Most of these native cut stones are at he bottom tier of pricing, and are usually not too expensive. They make good preforms for those of us who like to hobby facet. They provide a clear look into the material, and are not that much more in cost than some of the better rough. Keep your eyes open for these "fisheyes" and use then as starting points to your own creations.

If you are lucky enough to find them in round shapes (not often in my experience) you can re-cut with minimal loss. More often than not they are lazy ovals or large tear drop shapes. Even so, recutting to a round stone or one with better angles might only be a 20-30% loss instead of 50%plus.