|
The camera must be mounted on to the scope and this can be done in several ways. Some microscopes have a "third tube" designed specifically for camera mounting. In this case you will need to have some kind of adapter for the scope that accommodates this type of mount. For non-SLR type of cameras this usually means a threaded front lens so a screw-in adapter can be purchased. The third-tube type of microscopes can be fitted with a supplementary lines and a variety of screw-in t-Mount adapters to accommodate most digital cameras. A kit is soId by Scopetronix called the MaxView Plus System. It has a supplementary lens and set of adapter rings that can be used to fit most digital cameras. It requires one additional T-mount adapter (for SLR cameras) or a threaded screw-in adapter to fit most non-SLR digital cameras. It is not an inexpensive kit, but it does work nicely. (Price ~$300) I have used it on both my Nikon 4500 still camera, and also my Sony DRV-900 DV video camera. I have one microscope that has a third-tube. See images below. |
||||
 |
 |
 |
||
|
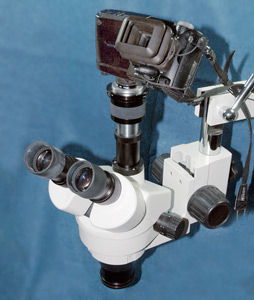
3rd tube scope - adapter only
|
With Nikon 4500 attached
|
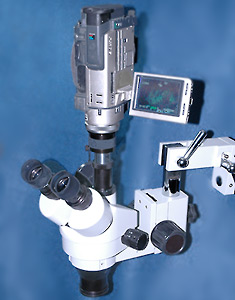
With Sony TRV-900 attached
|
||
| Some thought about the camera itself, first on most non-SLR digital cameras the lens mechanism for both the zooming and auto-focus will change the profile of the camera, In the three-tube setup shown above, the adapter ring that the camera uses on the third tube assembly must have room within to allow for the lens profile to change for most cameras. One of my original reasons for choosing a Nikon Coolpix 950, 990, or 4500 was that the zooming mechanism and the focus mechanism exist within the camera housing, and there is no profile change. Hence it can be mounted directly on the third-tube mount with no additional consideration for space between the front of the camera lens and the third-tube assembly with lens. The lens separation distance remains constant. | ||||
 |
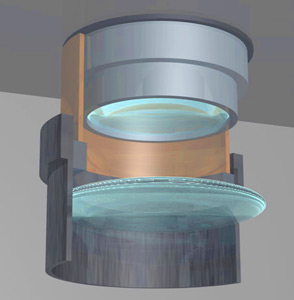 |
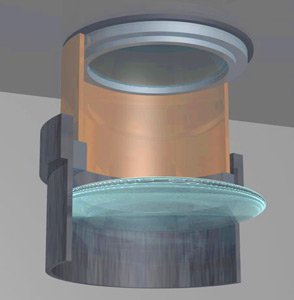
In the diagram to the far left, the camera is represented by the gray box above, and the lens has not yet begun to zoom or focus. The copper colored tube represents the adapter necessary for a digital camera that changes profile when focusing or zooming. In the second diagram the lens has extended itself downward changing the profile of the camera lens.
This type of camera requires an adapter with sufficient room to let the lens move freely and not strike the supplementary lens in the third tube. (The lower lens.) |
||
| Although I prefer cameras with built-in macro capabilities, it is not a requirement for a microscope camera, in most cases I use the standard focus mode with the zoom extended far enough to avoid in image cut-off caused by the tube assembly. In many cases the adapter system will cause a circular image in the camera because of differential focus between the microscope and the camera optics. When the this circular aperture appears on the image it often possible to remove it by simply zooming the lens outward. It has thus far always worked on my Nikon 950 and Nikon 4500. It has even worked on the Sony DV camera.
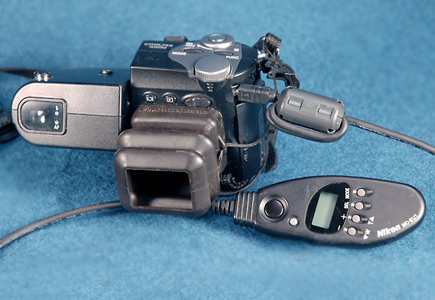
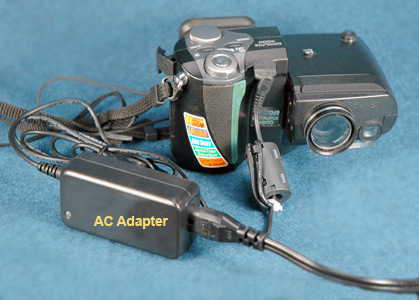
Another feature that I find indispensable in a microscope camera is some way to trigger the shutter remotely. At the very least the self-timer in most cameras can be used, but I like actual wired or infra red remote controls. The Nikon series of cameras comes through her too, there is a wired remote available for many of the Coolpix series including the 990 and 4500. The remote can often be purchased on E-bay and usually costs about $100. (Nikon MC EU-1) This remote unit will let you focus the camera (freeze focus too), zoom, and fire the shutter. The remote is shown below in the first photo to the left attached to a Nikon 4500. Selected focusing of the camera, when used on the microscope, requires some way to shut-off or over-ride the auto-focus mechanism. Many cameras have a "half-press" on the shutter which will stop-focus, but this is not ideal as it requires your hand on the shutter which may cause camera shake. Auto-focus causes many problems when you have the limited depth of field as with a microscope. Usually you know what subject you want in focus, but the camera will always choose the highest contrast area. Ideally you want to set a constant focus point in the camera, and then use the microscope focus to select the chosen area. (Available on the Nikon 900 series and 4500) Also notice the segmented hood that coves the LED rear display. This blocks light and makes it easier to see the screen which is usually used to focus. The screen is made by Hoodman and can be purchased for most digital cameras, another handy accessory. (Hoodman link.) The second image shows another vital accessory for microscope work, the camera should have an AC adapter to save on extended use at the microscope. Most of the digital cameras have this is an accessory. Manual control of the shutter and f-stop is also a desirable feature of a microscope camera. You may want to stop-down the lens to gain some depth of field. Since the camera should be stationary on its mount, and assuming you can remotely set off the shutter to diminish vibration, then you will likely want to select a higher f-stop to maximize the depth of field. (Present on the Nikon 900 series and 4500) |
||||
|
||||
| Desirable digital camera features Summary: (1) internal focus mechanism (more ways to attach camera) (2) remote control shutter and focus mechanism (or minimal a self-timer) (3) manual focus (4) AC adapter for prolonged use on scope (5) manual depth of field control (an f/8 or better) |
||||